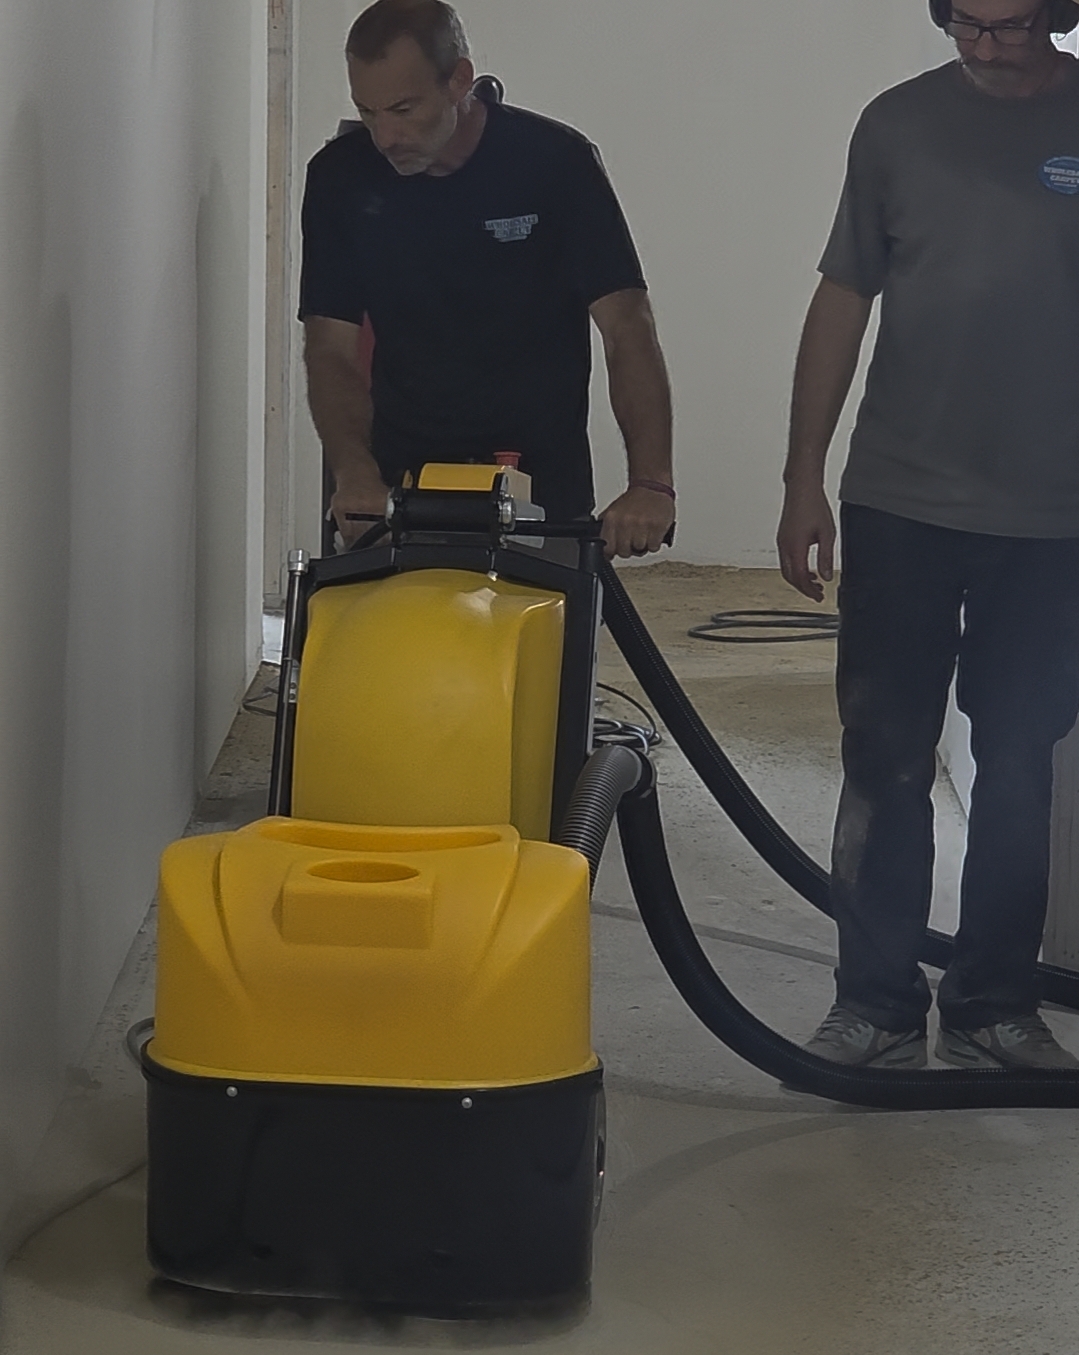
A garage floor can look clean and still be a poor candidate for coating. Old sealer, tire residue, hidden moisture, weak concrete at the surface, and smooth machine-troweled areas can all interfere with adhesion. Knowing how to prepare concrete is what separates a floor that holds up from one that starts peeling, blistering, or wearing through far too soon.
For epoxy, polyaspartic, and other resinous floor systems, preparation is not a quick cleaning step before the color goes down. It is the foundation of the whole installation. The coating can only bond as well as the concrete beneath it.
How to Prepare Concrete Before Applying Epoxy
Concrete preparation starts with an honest look at the slab. Before choosing a flake blend, metallic finish, solid color, or quartz system, determine whether the concrete is sound, dry enough, and free of materials that could block the coating.
A professional installer looks for more than visible cracks. They check for spalling, pitting, patchwork, oil contamination, previous coatings, curing compounds, sealers, and signs of vapor pressure. These conditions do not always make a floor impossible to coat, but they do change the preparation plan and may require repairs, moisture mitigation, or a different coating system.
Start with the age and condition of the slab
New concrete needs time to cure before a resinous coating is applied. While the exact timeline depends on the product and site conditions, many systems require a standard curing period of about 28 days. The concrete must also be dry enough for the specified coating system. A slab that looks dry on top may still be releasing moisture from below.
Older concrete brings different concerns. Garages and workshops often have oil spots, road salt damage, hot-tire pickup from old paint, and worn areas where the top layer of concrete has broken down. Basements may have moisture vapor issues. Retail and industrial spaces can have years of traffic, adhesive residue, and embedded dirt. Each problem needs to be addressed before coating begins.
Check for moisture before it becomes a coating failure
Moisture is one of the biggest reasons epoxy floors fail. Moisture vapor can push upward through concrete even when there is no standing water and no obvious leak. If the vapor level exceeds what a coating system can handle, it may cause bubbling, discoloration, soft spots, or loss of bond.
Testing should be part of the plan, especially for basements, ground-level slabs, commercial spaces, and concrete with a history of dampness. Depending on the job, installers may use relative humidity testing, calcium chloride testing, or other manufacturer-approved methods. The right answer depends on the slab and the coating system being installed.
If moisture is too high, applying epoxy anyway is not a shortcut. A compatible moisture barrier or mitigation system may be needed first. That adds cost, but it is far less costly than replacing a failed floor coating later.
Remove What the Coating Cannot Bond To
Concrete often has a layer of contamination that is not obvious until preparation begins. Dirt and loose debris are the easy part. The tougher issues are oil, grease, wax, silicone, paint, adhesive, sealers, and curing compounds.
Sweep and remove loose material first, then identify stains and coatings that need special treatment. Degreasers can help lift surface oil, but they are not a substitute for mechanical preparation. Oil that has penetrated deeply into porous concrete may require repeated treatment, localized removal, or repair work.
Previous paint and thin coatings should not be treated as a dependable base just because they are still visible. If an old coating is poorly bonded, the new system will only be attached to that weak layer. The goal is to reach clean, sound concrete or properly prepare a coating that has been confirmed to be firmly bonded and compatible.
Create the Right Concrete Surface Profile
Epoxy needs a mechanical bond. That means the concrete must have the proper texture, often called a concrete surface profile. A slab that feels slick, dense, or polished may look good but offers very little for a coating to grab.
For most professional epoxy floor systems, diamond grinding is the preferred method. Heavy-duty grinders remove weak surface paste, open the pores of the concrete, and create a consistent profile across the floor. The result should feel similar to fine to medium sandpaper, although the exact profile depends on the coating manufacturer and system thickness.
Grinding also gives an installer better control than acid etching. Acid can be inconsistent, particularly on dense concrete or slabs with sealers and contaminants. It can also leave residue if it is not neutralized and rinsed correctly. Etching may have a role in limited situations, but it is not a replacement for proper mechanical grinding on a serious coating project.
At Prime Epoxy Coatings, surface preparation is handled with heavy-duty grinding equipment and HEPA dust collection. That matters because preparation should not leave a homeowner, business, or neighboring work area covered in concrete dust. It also allows the crew to see the actual condition of the slab as work progresses.
Pay attention to edges, joints, and hard-to-reach areas
The middle of the floor is only part of the job. Coatings often fail first at the edges, around columns, near overhead doors, and along wall lines when those areas receive less preparation than the open floor.
Hand grinders and edge tools are used to properly profile these locations. Expansion joints, control joints, and cracks also need a decision before coating. Some joints should remain functional rather than being filled solid. Others may be cleaned, repaired, or filled with a flexible material depending on movement and the desired finished look.
Repair Cracks, Pits, and Uneven Areas
A coating is a finish, not a structural repair. It can improve the appearance of minor surface flaws, but it will not correct active slab movement, severe settlement, or concrete that is crumbling under traffic.
Cracks should be evaluated for cause and movement. Stable hairline cracks can often be routed and filled as part of the preparation process. Larger cracks, spalls, and pitted areas may need a compatible patching material. The repair must be fully cured, properly ground, and feathered into the surrounding floor before the base coat is applied.
Leveling is a separate issue. Decorative epoxy can make a floor look dramatically better, but it does not automatically make an uneven slab flat. If water needs to drain a certain direction, equipment requires a level footprint, or a retail floor needs a smoother walking surface, surface flattening or concrete leveling should be addressed before coating.
Vacuum Thoroughly and Keep the Surface Clean
After grinding, every bit of dust matters. Fine concrete dust can act as a bond breaker between the slab and the coating. Professional crews use industrial HEPA vacuums during grinding and again before application to remove dust from the floor, cracks, joints, and perimeter areas.
Once the slab is prepared, keep foot traffic and contamination under control. Do not walk across the area with dirty shoes, park a vehicle on it, or bring in wet tools and materials. If cleaning is needed after final vacuuming, use only products and methods approved for the coating system. A floor can be mechanically prepared correctly and still have problems if it is re-contaminated before the primer or base coat goes down.
Confirm Conditions Before Coating Begins
Concrete preparation is not finished when the grinder stops. Before coating, confirm that the slab is clean, dry enough, properly profiled, and repaired where needed. Temperature and humidity also matter because they affect cure time, working time, and the appearance of the finished floor.
A good final check includes these points:
- The concrete is structurally sound, with weak or loose material removed.
- Oil, grease, old coatings, sealers, and adhesive residue have been addressed.
- Moisture testing supports the chosen coating system, or a proper moisture barrier is included.
- Cracks, pits, and spalls have been repaired with compatible materials.
- The slab has been mechanically profiled and thoroughly vacuumed.
- Site temperature, humidity, and cleanliness are within the product requirements.
This is also the point where product selection should match the job. A decorative flake epoxy floor may be an excellent fit for a garage or showroom. Quartz granular epoxy may be better for areas that need added texture and durability. Commercial facilities may need a system designed around traffic, chemical exposure, downtime, cleaning practices, and moisture conditions.
When Professional Concrete Preparation Makes Sense
A small, clean slab with no moisture concerns may seem like a straightforward do-it-yourself project. But garage floors, basements, workshops, and commercial concrete often reveal problems only after preparation starts. Renting a grinder does not guarantee the right profile, effective dust control, correct edge work, or moisture evaluation.
Professional preparation is especially worthwhile when a floor has existing paint, heavy oil staining, visible damage, uneven areas, prior coating failure, or a history of moisture. The goal is not simply to make the concrete look rough. The goal is to create a clean, sound, properly profiled surface that matches the coating system going on top.
A durable floor starts long before the final color, flakes, or gloss coat. If you are planning to protect a garage, workspace, basement, retail floor, or commercial concrete surface, schedule a free estimate and get the slab evaluated before choosing the finish. The right preparation gives the finished floor a fair chance to perform for years.
Leave a Reply